Embroidery is a beloved craft that has been practiced for centuries, offering endless possibilities for creative expression. One of the most charming and popular embroidery themes is mushroom embroidery patterns. In this comprehensive guide, we will explore how to create mushroom embroidery patterns, the concept of pattern embroidery, how to use a pattern for embroidery, and tips for designing and selecting materials for the best results.
How to Make Mushroom Embroidery Pattern
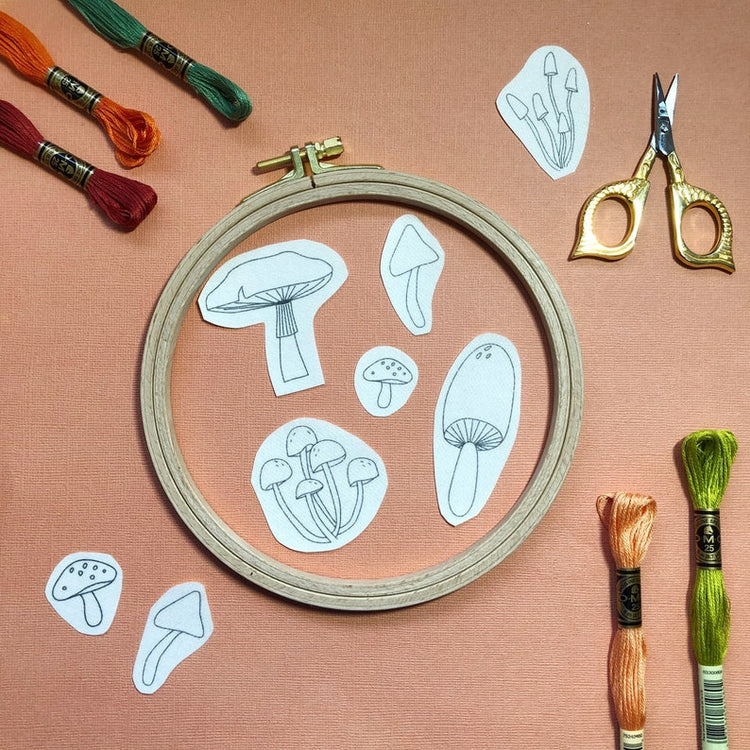
Creating a mushroom embroidery pattern can be a rewarding and enjoyable experience, allowing you to showcase your creativity and love for nature. Here’s a step-by-step guide on how to make a mushroom embroidery pattern:
Inspiration: Begin by gathering inspiration from various sources such as photographs, illustrations, or even real mushrooms. This will help you visualize the design and details you want to incorporate into your embroidery pattern.
Sketching: Using a pencil and paper or digital drawing tools, sketch out your mushroom embroidery design, focusing on the shape, size, and details of the mushrooms, as well as any additional elements like leaves, stems, or background patterns.
Transferring to Fabric: Once you’re satisfied with your design, transfer it onto your embroidery fabric using a transfer pencil, lightbox, or tracing paper. Make sure to use a washable or easily removable method to avoid leaving permanent marks on your fabric.
Choosing Stitches: Select the embroidery stitches that will best complement your mushroom design. Common stitches used in mushroom embroidery include satin stitch, backstitch, French knots, and seed stitch, among others.
Embroidering: Finally, start embroidering your mushroom pattern on the fabric, following your sketched design and chosen stitches. Take your time and enjoy the process, adding details and textures to bring your mushroom embroidery pattern to life.
What is Pattern Embroidery?
Pattern embroidery refers to the practice of using pre-designed patterns or templates to create embroidered designs on fabric. These patterns can range from simple outlines to intricate designs, providing a guide for embroiderers to follow while stitching.
Pattern embroidery is a popular choice for both beginners and experienced embroiderers alike, as it eliminates the need to create a design from scratch and allows for consistent and uniform stitching. Patterns can be purchased, downloaded online, or created by hand, offering endless possibilities for customization and creativity.
How Do You Use a Pattern for Embroidery?
Using a pattern for embroidery is a straightforward process that involves several key steps:
Selecting a Pattern: Choose a pattern that suits your skill level and interests. Whether you prefer traditional, contemporary, or whimsical designs, there’s a pattern out there for you.
Preparing the Fabric: Prepare your embroidery fabric by washing, ironing, and stabilizing it as needed to ensure a smooth and even stitching surface.
Transferring the Pattern: Transfer the selected pattern onto your fabric using a transfer pencil, lightbox, or tracing paper, ensuring accurate placement and alignment.
Choosing Stitches: Decide on the embroidery stitches that will best bring your pattern to life, considering the design, texture, and level of detail.
Embroidering: Follow the pattern’s guidelines and your chosen stitches to embroider the design onto the fabric, taking care to maintain consistent tension and stitch placement.
What is the Best Way to Design Embroidery?
Designing embroidery involves a combination of creativity, planning, and attention to detail. Here are some tips for designing embroidery that will help you create stunning and unique pieces:
Research and Inspiration: Gather inspiration from various sources such as nature, art, culture, and everyday life. Explore different styles, techniques, and themes to spark your creativity.
Sketching and Planning: Start by sketching your design ideas on paper or digitally, experimenting with shapes, colors, and compositions. Consider the size and placement of your design, as well as the overall aesthetic you want to achieve.
Simplification and Balance: Keep your design simple and balanced, avoiding clutter and excessive detail. Focus on the essential elements that convey your message or theme effectively.
Color Selection: Choose a harmonious color palette that enhances your design and complements the embroidery fabric. Consider the mood, atmosphere, and emotion you want to evoke with your color choices.
Feedback and Revision: Seek feedback from others, whether fellow embroiderers, friends, or family, and be open to making revisions and adjustments to improve your design.
What is the Best Material for Embroidery?
Selecting the right material for embroidery is crucial for achieving professional-looking results. Here are some popular materials used in embroidery
Embroidery Floss: Made from cotton, silk, or synthetic fibers, embroidery floss is the most commonly used thread for embroidery due to its versatility and wide range of colors.
Embroidery Fabric: Choose a high-quality fabric that is suitable for embroidery, such as cotton, linen, or even silk, depending on the project’s requirements and desired outcome.
Embroidery Hoops: Use embroidery hoops or frames to hold the fabric taut while stitching, helping to maintain tension and prevent distortion.
Needles: Select embroidery needles that are appropriate for the fabric and thread you are using, considering factors such as size, length, and sharpness.
Stabilizers and Backing: Use stabilizers or backing materials to support and reinforce the fabric, especially for intricate or dense embroidery designs.
Tips to Make the Best Mushroom Embroidery Pattern
Creating a captivating mushroom embroidery pattern requires attention to detail, creativity, and patience. Here are some tips to help you make the best mushroom embroidery pattern:
Study Real Mushrooms: Take the time to study real mushrooms to understand their shapes, textures, and colors, which will help you create a more realistic and accurate embroidery pattern.
Experiment with Stitches: Explore different embroidery stitches to create textures and details that bring your mushroom design to life, such as using French knots for mushroom caps or satin stitch for stems.
Incorporate Background Elements: Consider adding background elements like leaves, branches, or woodland creatures to enhance your mushroom embroidery pattern and create a cohesive and visually appealing composition.
Personalize Your Design: Add personal touches and unique elements to your mushroom embroidery pattern, such as incorporating your favorite colors, patterns, or symbols, to make it truly one-of-a-kind.
Practice and Patience: Like any skill, embroidery requires practice and patience to master. Take your time, enjoy the process, and don’t be afraid to experiment and make mistakes along the way. With practice, you’ll improve your embroidery skills and create stunning mushroom embroidery patterns that you can be proud of.
Ending remarks
Mushroom embroidery patterns offer a delightful and whimsical theme for embroidery enthusiasts in Canada and around the world. Whether you’re a beginner looking to learn the basics or an experienced embroiderer seeking inspiration and tips to improve your skills, this comprehensive guide provides you with all the information you need to create beautiful and unique mushroom embroidery patterns. So, grab your needles, threads, and embroidery hoops, and let your creativity flourish as you embark on your mushroom embroidery journey!